MCP Server Implementation Guide
Background
Higress, as an Envoy-based API gateway, supports hosting MCP Servers through its plugin mechanism. MCP (Model Context Protocol) is essentially an AI-friendly API that enables AI Agents to more easily call various tools and services. Higress provides unified capabilities for authentication, authorization, rate limiting, and observability for tool calls, simplifying the development and deployment of AI applications.
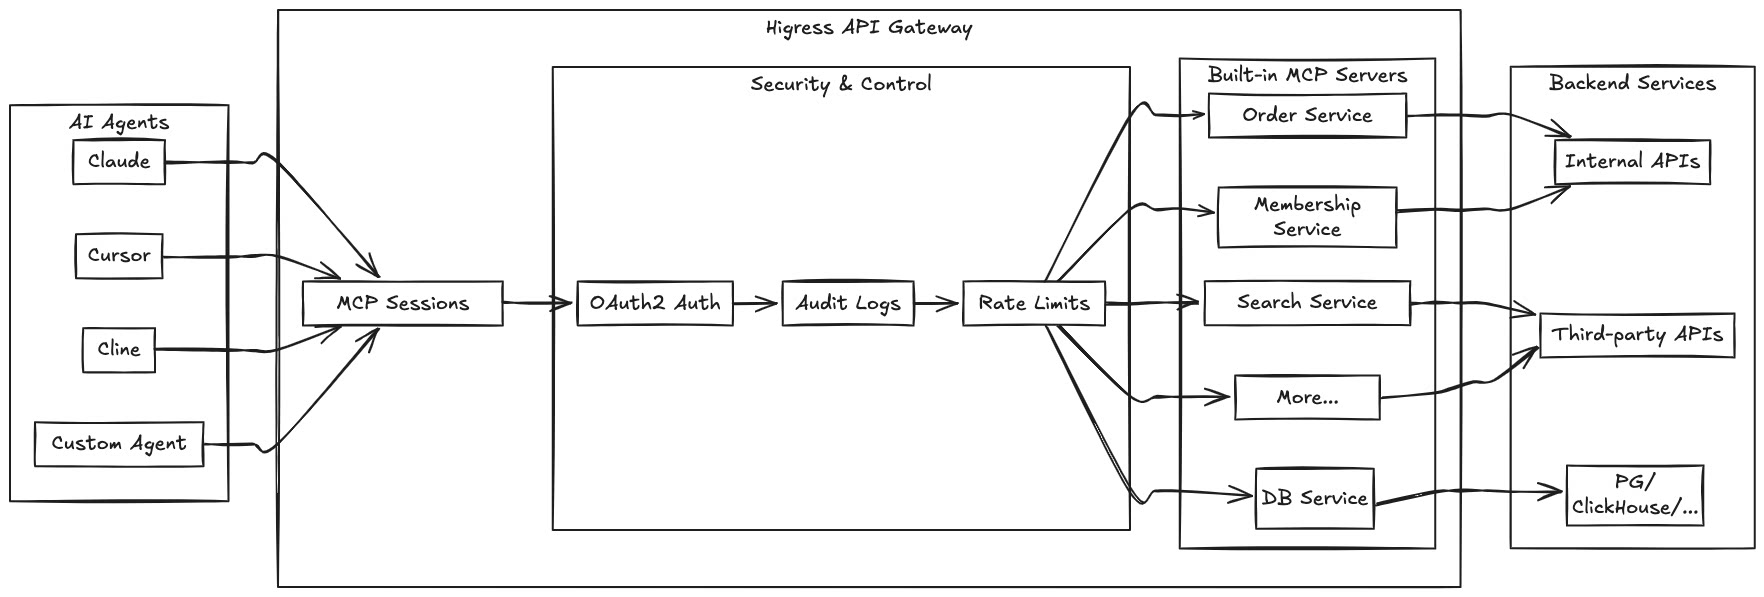
By hosting MCP Servers with Higress, you can achieve:
- Unified authentication and authorization mechanisms, ensuring the security of AI tool calls
- Fine-grained rate limiting to prevent abuse and resource exhaustion
- Comprehensive audit logs recording all tool call behaviors
- Rich observability for monitoring the performance and health of tool calls
- Simplified deployment and management through Higress's plugin mechanism for quickly adding new MCP Servers
This guide explains how to implement a Model Context Protocol (MCP) server using the Higress WASM Go SDK. MCP servers provide tools and resources that extend the capabilities of AI assistants.
Overview
An MCP server is a standalone application that communicates with AI assistants through the Model Context Protocol. It can provide:
- Tools: Functions that can be called by the AI to perform specific tasks
- Resources: Data that can be accessed by the AI
Note
: MCP server plugins require Higress version 2.1.0 or higher to be used.
Project Structure
A typical MCP server project has the following structure:
my-mcp-server/
├── go.mod                 # Go module definition
├── go.sum                 # Go module checksums
├── main.go                # Entry point that registers tools and resources
└── tools/
    └── my_tool.go         # Tool implementation
Server Configuration
Define a configuration structure for your MCP server to store settings like API keys:
// config/config.go
package config

type MyServerConfig struct {
    ApiKey string `json:"apiKey"`
}
Tool Implementation
Each tool should be implemented as a struct with the following methods:
Description(): Returns a description of the toolInputSchema(): Returns the JSON schema for the tool's input parametersCreate(): Creates a new instance of the tool with the provided parametersCall(): Executes the tool's functionality
Example:
// tools/my_tool.go
package tools

import (
    "encoding/json"
    "errors"
    "fmt"
    "net/http"

    "my-mcp-server/config"
    "github.com/alibaba/higress/plugins/wasm-go/pkg/mcp/server"
    "github.com/alibaba/higress/plugins/wasm-go/pkg/mcp/utils"
)

// Define your tool structure with input parameters
type MyTool struct {
    Param1 string `json:"param1" jsonschema_description:"Description of param1" jsonschema:"example=example value"`
    Param2 int    `json:"param2,omitempty" jsonschema_description:"Description of param2" jsonschema:"default=5"`
}

// Description returns the description field for the MCP tool definition.
// This corresponds to the "description" field in the MCP tool JSON response,
// which provides a human-readable explanation of the tool's purpose and usage.
func (t MyTool) Description() string {
    return `Detailed description of what this tool does and when to use it.`
}

// InputSchema returns the inputSchema field for the MCP tool definition.
// This corresponds to the "inputSchema" field in the MCP tool JSON response,
// which defines the JSON Schema for the tool's input parameters, including
// property types, descriptions, and required fields.
func (t MyTool) InputSchema() map[string]any {
    return server.ToInputSchema(&MyTool{})
}

// Create instantiates a new tool instance based on the input parameters
// from an MCP tool call. It deserializes the JSON parameters into a struct,
// applying default values for optional fields, and returns the configured tool instance.
func (t MyTool) Create(params []byte) server.Tool {
    myTool := &MyTool{
        Param2: 5, // Default value
    }
    json.Unmarshal(params, &myTool)
    return myTool
}

// Call implements the core logic for handling an MCP tool call. This method is executed
// when the tool is invoked through the MCP framework. It processes the configured parameters,
// makes any necessary API requests, and formats the results to be returned to the caller.
func (t MyTool) Call(ctx server.HttpContext, s server.Server) error {
    // Get server configuration
    serverConfig := &config.MyServerConfig{}
    s.GetConfig(serverConfig)
    if serverConfig.ApiKey == "" {
        return errors.New("missing api key in server configuration")
    }

    // Implement your tool's logic here
    // ...

    // Return results
    utils.SendMCPToolTextResult(ctx, fmt.Sprintf("Result: %s, %d", t.Param1, t.Param2))
    return nil
}
Tool Loading
For better organization, you can create a separate file to load all your tools:
// tools/load_tools.go
package tools

import (
    "github.com/alibaba/higress/plugins/wasm-go/pkg/mcp"
    "github.com/alibaba/higress/plugins/wasm-go/pkg/mcp/server"
)

func LoadTools(server *mcp.MCPServer) server.Server {
    return server.AddMCPTool("my_tool", &MyTool{}).
        AddMCPTool("another_tool", &AnotherTool{})
        // Add more tools as needed
}
This approach to organizing code facilitates integration with the all-in-one MCP server plugin. The all-in-one plugin combines multiple MCP servers into a single plugin, reducing the overhead of deploying multiple plugins on the gateway.
All-in-One Integration
The all-in-one plugin packages multiple MCP servers into a single WASM binary. Each MCP server maintains its own identity and configuration, but they share the same plugin instance. Here's an example of how multiple MCP servers are integrated in the all-in-one plugin:
// all-in-one/main.go
package main

import (
    amap "amap-tools/tools"
    quark "quark-search/tools"

    "github.com/alibaba/higress/plugins/wasm-go/pkg/mcp"
)

func main() {}

func init() {
    mcp.LoadMCPServer(mcp.AddMCPServer("quark-search",
        quark.LoadTools(&mcp.MCPServer{})))
    mcp.LoadMCPServer(mcp.AddMCPServer("amap-tools",
        amap.LoadTools(&mcp.MCPServer{})))
    mcp.InitMCPServer()
}
The configuration for the all-in-one plugin follows the same pattern as individual MCP server plugins. The name field in the server configuration is used to identify and route requests to the appropriate MCP server within the all-in-one plugin.
Main Entry Point
The main.go file is the entry point for your MCP server. It registers your tools and resources:
// main.go
package main

import (
    "my-mcp-server/tools"

    "github.com/alibaba/higress/plugins/wasm-go/pkg/mcp"
)

func main() {}

func init() {
    mcp.LoadMCPServer(mcp.AddMCPServer("my-mcp-server",
        tools.LoadTools(&mcp.MCPServer{})))
    mcp.InitMCPServer()
}
Plugin Configuration
When deploying your MCP server as a Higress plugin, you need to configure it in the Higress configuration. Here's an example configuration:
server:
  # MCP server name - MUST match the name used in mcp.AddMCPServer() in your code
  name: my-mcp-server
  # MCP server configuration
  config:
    apiKey: your-api-key-here
  # Optional: If configured, acts as a whitelist - only tools listed here can be called
  tools:
  - my_tool
  - another_tool
Important
: The
namefield in the server configuration must exactly match the server name used in themcp.AddMCPServer()call in your code. This is how the system identifies which MCP server should handle the request.
Dependencies
Your MCP server must use a specific version of the wasm-go SDK that supports Go 1.24's WebAssembly compilation features:
# Add the required dependency
go get github.com/alibaba/higress/plugins/wasm-go
Make sure your go.mod file specifies Go 1.24:
module my-mcp-server

go 1.24

require (
    github.com/alibaba/higress/plugins/wasm-go v1.4.4-0.20250324133957-dab499f6ade6
    // other dependencies
)
Building the WASM Binary
To compile your Go code into a WebAssembly (WASM) file, use the following command:
GOOS=wasip1 GOARCH=wasm go build -buildmode=c-shared -o main.wasm main.go
This command sets the target operating system to wasip1 (WebAssembly System Interface) and architecture to wasm (WebAssembly), then builds your code as a C-shared library and outputs it as main.wasm.
Using the Makefile
A Makefile is provided to simplify the build process. It includes the following targets:
make build: Builds the WASM binary for your MCP servermake build-image: Builds a Docker image containing your MCP servermake build-push: Builds and pushes the Docker image to a registrymake clean: Removes build artifactsmake help: Shows available targets and variables
You can customize the build by setting the following variables:
# Build with a custom server name
make SERVER_NAME=my-mcp-server build

# Build with a custom registry
make REGISTRY=my-registry.example.com/ build-image

# Build with a specific version tag
make SERVER_VERSION=1.0.0 build-image
Testing
You can create unit tests for your tools to verify their functionality:
// tools/my_tool_test.go
package tools

import (
    "encoding/json"
    "fmt"
    "testing"
)

// TestMyToolInputSchema tests the InputSchema method of MyTool
// to verify that the JSON schema configuration is correct.
func TestMyToolInputSchema(t *testing.T) {
    myTool := MyTool{}
    schema := myTool.InputSchema()

    schemaJSON, err := json.MarshalIndent(schema, "", "  ")
    if err != nil {
        t.Fatalf("Failed to marshal schema to JSON: %v", err)
    }

    fmt.Printf("MyTool InputSchema:\n%s\n", string(schemaJSON))

    if len(schema) == 0 {
        t.Error("InputSchema returned an empty schema")
    }
}